Jan 30, 2009

Fitted Forecast

Here's my version of Stefanie Japel's Forecast. I've made quite a lot of changes, replacing the ribs on sleeves and body with shaped knitting in pattern. And, of course, removed the bobbles in the cable, because I don't want to be covered in nipples, especially not on the arms. Also, I made the button bands and cuffs in seed stitch to match the collar, and I have to say I like it better with less pattern confusion, and I think my version looks nicer on my body, while the original looks better on skinny girls!

jan3009 025

Here are the changes in more detail:
  • I knitted size L, with 10 extra sts cast on under each arm, for a less tight fit under the arms (176 sts).
  • I knitted the 176 sts to just under the bust, then started decreasing, 16 sts over 11 cm, which with my gauge was 4 sts on every 10th row, 2 in each side with 6 sts between decreases
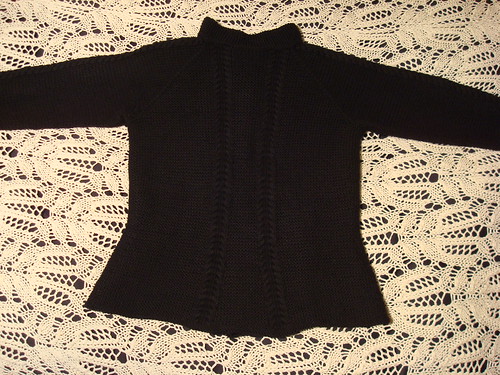
  • Then, I increased 4 sts (2 on each side) on every 4th row 6 times, then on every 7th row 3 times. I also increased 8 sts between the cables that run down the back, so they flare a bit away from each other (saved the sts for later).
  • The sleeves are tapered, starting with 67 sts and decreasing to 47 sts by decreasing 2 sts on every 8th row. I finished with 4 rows of reverse stockinette, 12 rows of seed stitch, then cast off with knitting on the wrong side.
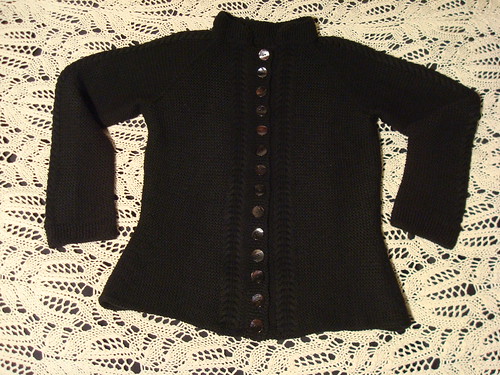
  • Then, I picked up all the sts of each front and the bottom edge, and knitted 3 rows of reverse stockinette (2 sts increase once on each corner), then seed stitch button bands (8 rows each) on front and cast off like on sleeve cuffs.

The back, showing off the increases between cables, and on the sides:

jan3009 030

Jan 20, 2009

Rescued Baroness

I needed a gray hat. And how often can you really truthfully say that you need to knit something?? I wanted it simple, so I picked the Baroness Beret pattern by Susan Power at Knit Therapy. A pretty good pattern, with the exception of the use of k2tog tbl which looked bad, so I used ssk instead. It uses a tubular cast-on, which I hadn't tried before, but it was not terribly difficult with these directions. The hat turned out perfect, but when I washed it, it sort of collapsed into a streched huge bag. Noooo!!!
After storing for a few days to consider my options, I rescued it with a very thin elastic thread through the rib:This solved the problem perfectly, so now the hat looks like this, just what I imagined (although maybe a hot iron wouldn't harm it):

Puke Mill

You may know of a type of Christmas decoration where hot air from candles make an angel-decorated propeller turn, and the motion rings some bells and makes the angels sick. Thus the name of this decoration according to ancient German tradition, puke mill (German: Kotzenmühle, Herr Dr. Maly please correct my spelling if I'm wrong - ahh: Kotzmühle is the correct spelling, thank you Herr Dr!!). This puke mill is indicated in the picture below as the old puke mill. You see, there's a new puke mill in town. The best puke mill!! Wheeee! The new puke mill was my Christmas present, and arrived along with its companion, the japanese winder. Winding is very addictive, and we are in the process of winding our stashes.

PS By some interesting coincidence, both the old and new puke mills are Swedish

Jan 9, 2009

Felting

Here's the story of some real felting, not "just" fulling of something knitted. Annie invited us (Debi and me) to try it in her studio. Tusind tak, Annie! Det var virkelig hyggeligt og spændende at lære.
We made two hats, each constructed on a ball, in three layers of wool. In the first layer, the fibers of the roving are vertical (right hat), while the second layer is wrapped in a spiral (left hat), putting the fibers horizontal:
The third layer is again vertical, and is - more or less - the only layer that shows in the end, the second layer peeking through just a bit. We decorated the third layer with different colors of roving and scraps of yarn to give interesting effectsNow comes the part with the hot soapy water. The entire ball with wool is wrapped in nylon stockings with the legs cut off (two pairs) that are knotted tightly. This keeps the wool more or less in place during the bouncing stage (yes, technical term) where the entire assembly is bounced in the hot soap water for 10-15 minutes. This felts the wool together, forming a fabric (which is strong because its three layers are at right angles to each other).
Now comes the fulling stage, in which the hat is rubbed against a washing board, or in our case a tray for paint. This makes the fabric shrink and thicken (the only stage you go through with items that are knitted, because they are already a fabric when you begin)We fulled the hats until they fit, trying them on several times on the way, and shaping them to our heads and taste. I kept my hat round, Debi made hers flat on top. This is maybe the most interesting stage, where the wool can be bent and worked. In the very end, we ran the hats on a wool program in the washing machine to wash out the soap, followed by some final shaping (as the machine washing shrinks the hat somewhat).


Hello there, we may look a bit funny, but so would you if you had wet wool with lots of soap on your head: