Dec 30, 2009

En babycardigan fra helvede

Så er den endelig færdig, cardiganen til det lille hentesæt af silke/alpaca. Det har taget sin tid. Mange overspringshandlinger, senest blev ærmernes glatstrikning oversprunget af anden glatstrikning i form af et Kusha Kusha tørklæde. Det kom jeg så til at sidde fast i da mønsteret gik over til delen med ren silke/rustfrit stål, for det er ret levende og irriterende at strikke med. Men det er vel egentligt også meningen med en overspringshandling, at den skal tvinge en tilbage til det man egentligt var i gang med??

Men nu er den altså færdig. Den er 5 cm kortere end mønsterets vanvittigt lange rør, men jeg fandt selvfølglig først ud af at den var alt for lang da hele kroppen var strikket og skuldrene lukket af. Jeg er nu godt tilfreds med, at jeg fandt selvdisciplinen til at lave det om. Eneste anden modifikation er kraven, som jeg lukkede af før ombukket, for jeg kan ikke se hvad en baby, der kun kan ligge ned, skal med sådan en bukket krave.
Og her er den så:
DSC01911

Dec 19, 2009

Endelig ferie

Så! Nu er jeg endelig færdig med mit eksamensprojekt, så nu er der virkelig tid til at strikke... og skrive om lidt af alt det jeg har fået strikket siden jeg sidst skrev på bloggen, det viser sig det var i september.

Jeg har været i gang med hentesættet af mintgrøn silke-alpaca i flere måneder, og bukserne er jo i hvert fald færdige. Huen er i teorien også færdig, men den er alt for spids, så jeg skal have fundet på en måde at redde den på. Mere om det en anden gang, hvor jeg også vil underholde mere med cardiganen. Kroppen er strikket og strikket om, men så kom jeg til at sidde fast i ærmerne. Glatstrikning...

Så pludselig hoppede et projekt, der har været i kø et stykke tid, frem fra gemmerne. Et Kusha Kusha tørklæde af merino og silke/rustfrit stål fra Habu i NY. For at det skulle fylde mindre på turen til DK havde jeg vundet garnet af paprørene det var på, og det havde altså fået den rustfri stål til at danne en stor, kaotisk fuglerede. Og det trængte jo til at blive filtret ud, og så kunne jeg lige så godt gå i gang med at strikke for at være sikker på, at det ikke filtrede sig sammen igen. God undskyldning, ikke?

DSC01901

Sep 24, 2009

Swallowtail

After a long battle, interrupted by so many other projects, I've now finished by swallowtail shawl.
It's a very easy pattern, but two things made this difficult. First, the 14 repeats of identical simplicity in the beginning was boring me out of my mind. Now that it's finished, I can see that it really works well with the edge, but... too boring.
The other problem was the yarn, Cherry Hill Suri Alpaca. I don't know if this is characteristic of this type of alpaca, but it is a very stiff yarn. Very difficult to manage. If the stitches slip off the needle, they don't stay in shape. They just immediately unravel. Not to talk about knitting nupps. They can be bad enough as it is, but become disastrous with this yarn. All the stitches and yo's just fly apart.
But enough complaining. The process was a little hard, but I think the result speaks for itself:

DSC_2213

Sep 18, 2009

Jumpsuit

The jumpsuit I started in August is now finished. It came out very nice, the transitions from knitting with dpn's almost went away when I washed it.

DSC01695

Of course I couldn't help but modify a bit... so the top part, which was supposed to be knitted back and forth and sewn together, is just knitted in the round. I know, I had to purl every other round to get garter stitch, but it meant no sewing :) To hide the transition, I did a fake seam in each side, knitting that stitch every other round and slipping it every other. Finally, added some cute, asian-looking buttons from Fandango:

DSC01693

Aug 19, 2009

Warm Set for Tadpole

I've started knitting a set of clothing to keep the little Tadpole warm when it comes out i February. I was allowed to use some gorgeous yarn from my sister's stash, Blue Sky Alpacas Alpaca & Silk. I know, the Tadpole will probably puke on it immediately and it's handwash only. But it's so soft. A entirely decent thing to wear when you have never been encumbered with clothing before.

The pattern is from Drops, here it is in English og her er det på dansk. The Danish version actually says it will look good on a little girl, but I think it is unisex enough when knitted in green:
DSC01594

The legs are knitted separately in the round, which probably makes good sense, I'm sure the pattern would look bad sewn together. But it is quite problematic to put the legs together. OK, the pattern says to knit 2 cm back and forth to make it easier, but it doesn't make it easy. Also, a circular needle that would be small enough for this number of stitches would be annoyingly short to knit with, so I had to continue with dpn's after putting the legs together. But because the legs were pulling in each opposite directions, there are some ugly transitions although I pulled all stitches really tight. Oh well, here's to hoping it goes away when washed.

Aug 8, 2009

Cardigan for Tadpole

This project is a quick little knit that wasn't really that quick, as it involved some finishing. The pattern for this little cardigan is from "Simple Knits for Cherished Babies" by Erika Knight. I was seduced by the wonderful photography throughout the book, but I guess I should have researched the case a bit more before buying. The book is filled with errors, so beginners definately can't knit most of the projects. Advanced knitters can probably reconstruct most of it from the photos. The pattern for this little cardigan did not have any errors, possibly the only error-free pattern in the entire book! Earlier, I tried making a little garter stitch wrap top, but had to give up because the pattern was so unclear. Well, also ran out of yarn, and didn't want to buy more for such a dubious project.

But this little cardigan turned out very nice - from the front:
Aug2009 032

and from the back:
Aug2009 033

It's made of Rowan wool cotton, knitted on 3 mm needles though the pattern recommends 3 3/4 mm. But I think garter stitch needs to be tight to look good. I made a couple of modifications:
- added 5 stitches to the sleeve length
- knitted on edge around neck-fronts-back in the round with alternating purled/knitted rows

Aeolian

I've been working on Aeolian for a while... for some reason I got really bored in the middle, and put it away for a while. But then it came back with a vengeance, and I finished it in no time. Here it is:

Juli2009 032

For some reason I can't capture the beauty of this shawl in a photo at all, but I guess everybody knows what it looks like.

But the result is what I hoped for, soft and with good stitch definition. It is the shawlette size, but big enough by far - i used a 4 mm needle, so that gave some size too. I hated working the pearls, and they don't even show that much. So this may be my last beaded project as well as my first.

Jun 30, 2009

Mixed WIPs

I haven't blogged for a while, but I also haven't finished anything for a while!

But I do have a truckload of WIPs. First my Noro Bohus vest. It's coming along, I'll be at the underarm quite soon. Meanwhile, the patterns and color combinations are proliferating in unexpected ways

noro bohus

I've also had some good progress with my Bog Jacket. I'm past the critical point - the point where you remove the thumb trick stitches and graft the two ends together. Quite nasty, but it came out... not invisible, but not that frankensteinian either

bog

Some other TV knitting (and lots of episodes of The Wire) is my Cobalt Jacket. A top-down raglan of my own design. The earlier version was knitted on bigger needles, but the most recent incarnation is on 4 mm, relatively small for the thick mystery yarn I'm using

cobalt

Last, but not least, I've knitted most of my Aeolian for Vibeke, shhh! My first and probably last piece of beaded knitting. But it does look good, and I'll be done soon (just unraveling several rows tonight, but that's a temporary step back. Lifelines? No)

aeolian

May 26, 2009

Winning the lottery without playing

On a recent trip to NYC, I stayed with an old friend. At some point, she told me she had a sewing project that didn't fit her. Maybe it would fit me, so could I try it on? Well of course I could, and this is what it looked like:

DSC01385c

Perfect. Like it was tailor-made for me. And as it turns out, it is. Several years ago, we made a jacket for me by mutual effort (well, mostly she made it), and in a moment of confusion, this was the pattern she reached for when she made this jacket. How lucky can you really be??

In NY, there was also time for a little bit of shopping. I have been wanting to go to the Habu showroom for a while, and this time I did. It is very small, but there are so many treasures packed there, all of the exquisite Japanese type. And I suppose it also helps that the place is so hidden. No signs outside. Just go into the camouflaged building, say "Habu" to the doorman, and take the elevator to the 8th floor:
Habu Textiles
135 West 29th St. Suite 804
New York, NY 10001

I've been eyeballing the Kusha Kusha scarf for a while, so I got the yarn for that (two right skeins). And, I ordered A-4 2/10 Kusaki Zome silk for another project on my shortlist, a 1932 blouse from "A Stitch in Time". The darkest color was not in stock, so it was sent from Japan, and here it is (on the left):

DSC01394c

May 23, 2009

Yay! Thistle Vest Pattern Available

It took a while, but my thistle vest pattern is now available as a free Ravelry download.

You can get it here.

If you are not a member of Ravelry, sign up immediately :)

May 20, 2009

One More Vest!

After my recent self-proclaimed success with the Thistle Vest, I've jumped straight to another fair isle vest. I must have been bitten by some kind of bug?

This one is made from my stash Noro Kureyon Sock, that I have been experimenting with earlier, but was never convinced the experiments were going the right way. So the new deal is fair isle, heavily inspired by Bohus patterns. I love the Bohus style, the only complaint being that the patterns only cover yokes or front panels. It looks beautiful, but it means you have to knit almost an entire sweater in plain stockinette! So I zoomed in on the color pattern itself, fusing and modifying different Bohus designs. I think it's going well so far:I really like the way the dusty colors blend but still stand out.

May 14, 2009

Thistle Vest

My thistle vest is finally done, and it turned out very close to what I had imagined. Many times, I can "see" exactly what I want to make, but it turns out to be different in reality. This one not so! I get compliments when I wear it.The beautiful flower pattern on the vest comes from Dale of Norway, and was originally published with the name Damask. Lots of people have since made their own versions, many with Kauni, so this is just one of them.

But because I am actually so happy with the result, I have written a pattern (describing just the stitch count and centering the flower on the front of the vest).
It will be available as a free Ravelry download shortly. Apparently, they have to link user names to designer names manually, and this takes time. I've waited some days already, so I assume it happens soon.

Apr 8, 2009

Shalom!

I really liked the yoke pattern on Meghan McFarlane's Shalom from first sight. It is similar to Mini til voksne from design-club.dk, which I had been looking at for a while. But design-club only sell their patterns with yarn, so that would be something like $100. Their yarn comes from Henriksens Uldspinderi, and I can just drive there myself and buy directly from them at a discount. I understand that knitting designers have to make money, but we costumers don't enjoy being treated like idiots. I'll pay a reasonable price for a good pattern, but I'm not going to buy your overpriced yarns.

So. In addition to being free, Shalom also has a nicer pattern on the yoke. I found that purling tbl is not as bad as its reputation, and it really makes the pattern so much more elegant.

I changed a number of things. First, I knitted long sleeves. If it is cold enough to wear something this bulky, chances are my arms will be cold, too. I used some mystery Icelandic wool, which I believe is 100 m per 100 g, knitting on a 6 mm needle. Did not try to get gauge, just made up some numbers on the way. The pattern only has one (small) size, so I made it larger by adding a 4th pattern repeat to the yoke:

After the 3rd repeat, I had 159 pattern sts (plus 10 edge sts). I increased 46 sts more or less evenly over the pattern part, for a total of 215 sts. I arrived at this number by looking at the previous increase. 159 is 130% of 123 sts, so the next number should be 130% of 159 = 205 sts, plus 10 edge sts = 215 sts. Don't know if this logic fits with general rules of yoke shape, Zimmermann percentage system, and so on, but it seems to have worked well.

So I knitted the 4th repeat, and then the next problem was how to split the stitches for body and sleeves. McFarlane splits the stitches to make bit fluffy sleeve caps on purpose, but my situation was different as I wanted sleeves. So I just put the yoke on an measured on myself. This resulted in 46 sts for each sleeve, 59 for the back, and 32 for each front.

The sleeves are only very slightly tapered, decreasing 4 sts on the first 20 rows. I increased a few stitches in each side on the last 10 cm of the body, to give a bit of illusion of a waist (I have none).

That's that. Love how it turned out:

Mar 30, 2009

Thistle Vest

I have finally learned to knit fair isle. I didn't even know there was a specific technique for continental knitters! All my english and american books just show various diagrams of holding this and that yarn in this and that position. I didn't know none of that works for continental knitting, but what I could tell was how ugly my earlier swatches were. An hour or so with a Danish book worked wonders. At first I was sceptical. Holding one yarn over one finger and the other over two? But it really works, and is actually quite comfortable.

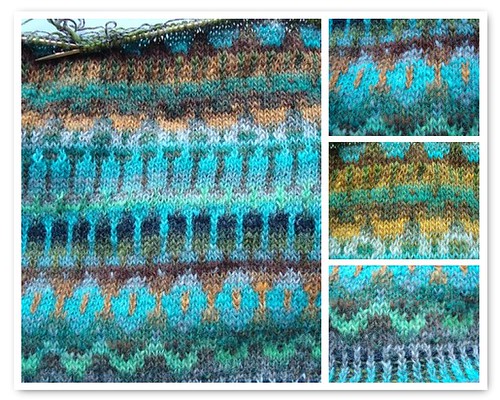
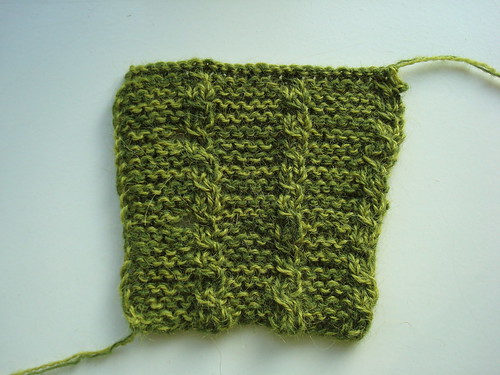
So then I just wanted to get straight to business. Well, that is the kind of business with only two colors, and not more than 7 stitches in one color. I still haven't figured out how to cross the yarns on the back without switching the skeins around, which I'm sure is not the way to do it.

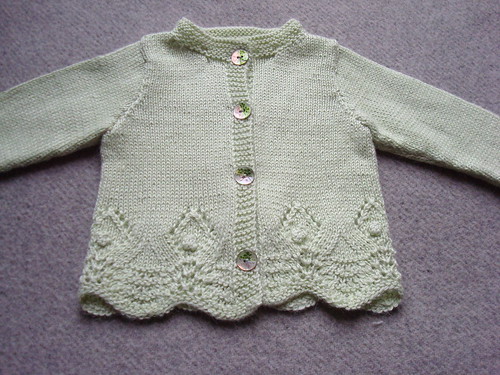
I wanted a round and flowery pattern, so I was happy to find that Pinneguri's beautiful thistle pattern doesn't have more than 7 stitches of one color.

After some swatching (yes, indeed), I decided to cast on 288 stitches, which is 9 pattern repeats. I cast on with the dominant color (which in my case is an orange-blue-brown multicolored Kauni, I used a grey one as background) and tried a tubular cast on first, my new favorite for rib! But it really does not work for a two-color rib. It was too bulky, so in the end, I used a standard cast-on, and - IMPORTANT - one row of all knit stitches in alternating color, followed by the two-color rib proper. This way, bumps of wrong color are avoided.Then, after a few rows of rib, 28 cm of the pattern followed
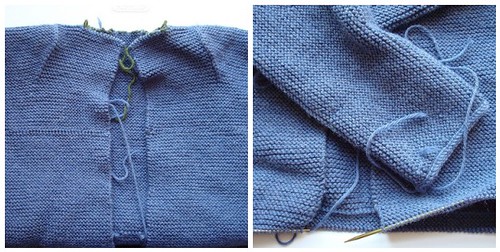
I have to admit that the blue color blends more into the gray background than I had expected. But, this is really just an experiment, so I guess that's ok. As you can see, I've started decreasing for arms and V-neck (more about that later - I'm using some numbers I came up with, so we'll have to wait and see how it works), with some stitches for steeking inserted. I've of course never made a steek, so in that respect, too, this is an experiment. In other words, don't worry about the colors when the whole thing may still fall apart later!

A gift, and some shopping...

In addition to the puke mill and winder, I got this fabulous gift for X-mas (I know, it's so long ago, but I haven't blogged much all winter in Denmark):As you can probably tell, it's a crochet hook case. It is beautifully made by my sister, who (of course) also put it on ravelry, where it has 39 hearts as of now :)

There was also time for a little bit of shopping. But I was very thrifty, I promise! In one second hand store (in the town of Christiansfeld, which was founded in the 18th century by a religious order from Herrnhut in Germany), I found these amazing bone needles. They are hand made, and not completely regular, but they are about 4 mm. I wonder how old they are. They were relatively expensive for a thrift store find (100 kr, about $20)
This find was much cheaper! 3 sets of double pointed needles and one standard set, plus 6 Norwegian style metal buttons. All together 25 kr or about $5. Well worth the time picking through all the other junk! The needles are all metal - hard to get your hands on nowadays. The dp's are 2, 3.5 and 4 mm, and the standard ones are 2.5 mm

Mar 1, 2009

After a Long Battle: Mermaid Mittens Finished

This project was a battle at times. It started as my X-mas present to the women in the family - 2 skeins of Koigu each. This turned out to be a strategic move, as it is less bad to suffer together.
Actually I am really happy with the result, so let's not overdo the suffering part:I knitted tightly on 2.25 mm needles (a bit hard on the hands) and followed The Yarn Owl's instructions for thumb gusset and fingers, which worked out perfectly after switching left and right to their meaningful places in the instructions. But that's OK, I also still have problems with those words myself.
I made a tubular cast-on with these instructions, works beautifully for this project, but did give rise to one problem - I wanted the bind-off to be 1) identical and 2) invisible. This is where the project hibernated a bit, but after some practice rounds with these instructions, I did pull myself together and got it done. And I am very happy with it, the beginning and end do look very similar:

Feb 17, 2009

Thrummed Mittens

Last week was our official family knitting week! Inspired by Knitting Daily's thrum theme, we chose these mittens as part of the program. We bravely made the thrums (despite warnings that this can act as a gateway drug to spinning, which again can lead to a farmhouse filled with sheep, goats, and alpacas) out of roving that I have also used for my felted hat , so they go very well together:I used Yarn Forward's pattern, with quite a lot of lazy modifications instead of obtaining gauge with my random stash Harrisville Orchid Yarn:
  • entire mitten knitted on 4 mm needles, so ribbing was 32 stitches and mitten 40 stitches
  • 8 stitches saved for thumb
  • when mitten was long enough decreased 4 stitches per round until 4 were left
  • 17 stitches for thumb

Feb 9, 2009

Sooo proud of myself

Look at this:

feb0909 023

Wow! It's a swatch. First time I both 1) made a swatch 2) washed it before measuring!!!
I know. 1) should be automatic and actually 2) should, too. But for me it took some unexpected happenings with the gauge of my forecast cardigan when I washed it, to actually start doing this.
The wonderful swatch is for Sukkertrøjen, designed by Marianne Isager. It is knitted with half Tvinni and half Spinni Alpaca (50% wool, 50% alpaca), both from Henrichsens Uldspinderi. I went on another trip to their factory outlet, and I promise I bought almost nothing there and it was very cheap...

Jan 30, 2009

Fitted Forecast

Here's my version of Stefanie Japel's Forecast. I've made quite a lot of changes, replacing the ribs on sleeves and body with shaped knitting in pattern. And, of course, removed the bobbles in the cable, because I don't want to be covered in nipples, especially not on the arms. Also, I made the button bands and cuffs in seed stitch to match the collar, and I have to say I like it better with less pattern confusion, and I think my version looks nicer on my body, while the original looks better on skinny girls!

jan3009 025

Here are the changes in more detail:
  • I knitted size L, with 10 extra sts cast on under each arm, for a less tight fit under the arms (176 sts).
  • I knitted the 176 sts to just under the bust, then started decreasing, 16 sts over 11 cm, which with my gauge was 4 sts on every 10th row, 2 in each side with 6 sts between decreases
  • Then, I increased 4 sts (2 on each side) on every 4th row 6 times, then on every 7th row 3 times. I also increased 8 sts between the cables that run down the back, so they flare a bit away from each other (saved the sts for later).
  • The sleeves are tapered, starting with 67 sts and decreasing to 47 sts by decreasing 2 sts on every 8th row. I finished with 4 rows of reverse stockinette, 12 rows of seed stitch, then cast off with knitting on the wrong side.
  • Then, I picked up all the sts of each front and the bottom edge, and knitted 3 rows of reverse stockinette (2 sts increase once on each corner), then seed stitch button bands (8 rows each) on front and cast off like on sleeve cuffs.

The back, showing off the increases between cables, and on the sides:

jan3009 030

Jan 20, 2009

Rescued Baroness

I needed a gray hat. And how often can you really truthfully say that you need to knit something?? I wanted it simple, so I picked the Baroness Beret pattern by Susan Power at Knit Therapy. A pretty good pattern, with the exception of the use of k2tog tbl which looked bad, so I used ssk instead. It uses a tubular cast-on, which I hadn't tried before, but it was not terribly difficult with these directions. The hat turned out perfect, but when I washed it, it sort of collapsed into a streched huge bag. Noooo!!!
After storing for a few days to consider my options, I rescued it with a very thin elastic thread through the rib:This solved the problem perfectly, so now the hat looks like this, just what I imagined (although maybe a hot iron wouldn't harm it):

Puke Mill

You may know of a type of Christmas decoration where hot air from candles make an angel-decorated propeller turn, and the motion rings some bells and makes the angels sick. Thus the name of this decoration according to ancient German tradition, puke mill (German: Kotzenmühle, Herr Dr. Maly please correct my spelling if I'm wrong - ahh: Kotzmühle is the correct spelling, thank you Herr Dr!!). This puke mill is indicated in the picture below as the old puke mill. You see, there's a new puke mill in town. The best puke mill!! Wheeee! The new puke mill was my Christmas present, and arrived along with its companion, the japanese winder. Winding is very addictive, and we are in the process of winding our stashes.

PS By some interesting coincidence, both the old and new puke mills are Swedish

Jan 9, 2009

Felting

Here's the story of some real felting, not "just" fulling of something knitted. Annie invited us (Debi and me) to try it in her studio. Tusind tak, Annie! Det var virkelig hyggeligt og spændende at lære.
We made two hats, each constructed on a ball, in three layers of wool. In the first layer, the fibers of the roving are vertical (right hat), while the second layer is wrapped in a spiral (left hat), putting the fibers horizontal:
The third layer is again vertical, and is - more or less - the only layer that shows in the end, the second layer peeking through just a bit. We decorated the third layer with different colors of roving and scraps of yarn to give interesting effectsNow comes the part with the hot soapy water. The entire ball with wool is wrapped in nylon stockings with the legs cut off (two pairs) that are knotted tightly. This keeps the wool more or less in place during the bouncing stage (yes, technical term) where the entire assembly is bounced in the hot soap water for 10-15 minutes. This felts the wool together, forming a fabric (which is strong because its three layers are at right angles to each other).
Now comes the fulling stage, in which the hat is rubbed against a washing board, or in our case a tray for paint. This makes the fabric shrink and thicken (the only stage you go through with items that are knitted, because they are already a fabric when you begin)We fulled the hats until they fit, trying them on several times on the way, and shaping them to our heads and taste. I kept my hat round, Debi made hers flat on top. This is maybe the most interesting stage, where the wool can be bent and worked. In the very end, we ran the hats on a wool program in the washing machine to wash out the soap, followed by some final shaping (as the machine washing shrinks the hat somewhat).


Hello there, we may look a bit funny, but so would you if you had wet wool with lots of soap on your head: